Manage
The Manage section of EasyLife 365 Identity provides administrators with a centralized, policy-driven view of all applications in their environment. It is designed to support governance, compliance, and bulk administration at scale.
In the Basic plan, the Manage section includes all operations related to ownership life cycle management. Additional capabilities require the Professional plan.
The Manage section is split into two closely related views:
- Manage App Registrations
- Manage Enterprise Applications
Both views share the same structure, interaction model, and governance concepts.
Purpose and governance approach
The Manage views are not application detail pages. Instead, they are control planes that allow administrators to:
- Assess policy compliance across many applications
- Quickly identify ownership gaps or rule violations
- Assign or change policies
- Perform bulk operations using import and export
These views serve as the operational backbone for enforcing ownership, policy, and activity concepts at scale. By integrating ownership models, activity tracking, and policy enforcement, they enable administrators to move from reactive management to proactive governance, even in large and complex environments.
Management table overview
Each Manage view presents applications in a table-based layout, with one row per application.
The table is optimized for scanning and filtering. Actions are applied directly from the table, and a Show details button in each row opens a read-only panel for a single application.
Common columns
The following columns appear in both App Registrations and Enterprise Applications:
| Column | Description |
|---|---|
| Name | Display name of the application. |
| Application ID | Client ID (App ID) of the application. |
| Created On | Date the application was created in Entra ID. |
| Policy | The governance policy currently assigned to the application. |
| Application Owner Rule | Indicates compliance with the Minimum Application Owner rule defined by the assigned policy. |
| Technical Owner Rule | Indicates compliance with the Minimum Technical Owner rule defined by the assigned policy. |
| Business Owner Rule | Indicates compliance with the Minimum Business Owner rule defined by the assigned policy. |
With a Professional license, the Manage Enterprise Applications view includes some additional columns:
| Column | Description |
|---|---|
| Last sign-in | The most recent recorded sign-in activity for the enterprise application, based on aggregated Entra ID sign-in data. |
| Activity rule | Indicates compliance with the Activity rule defined by the assigned policy. |
| Baseline Configuration rule | Indicates compliance with the Baseline Configuration rule defined by the assigned policy. |
The "Last sign-in" column is populated using the application activity data and is used by activity-based policy rules; app Registrations do not expose sign-in activity and therefore do not include this column. The other two columns correspond to policies that only apply to Enterprise Applications.
Understanding compliance indicators
The owner rule columns use clear visual indicators to communicate compliance status:
- ✔ (Check mark) — The application meets the corresponding rule defined by the assigned policy
- ✖ (Cross) — The application violates the corresponding rule and is non-compliant
These indicators allow administrators to quickly spot applications that require attention, without opening individual detail views.
Working with applications
The Manage views provide several capabilities for analyzing and managing applications at scale.
Viewing application details
The Name column of every row contains an information button (ⓘ) labelled Show details. Selecting it opens a side panel with everything the admin portal knows about that application, so you can inspect a single application without leaving the list.
The panel only reports: nothing in it changes the application. It contains the following sections:
- Details — Application ID, Object ID, the creation date and the assigned policy. For enterprise applications, the panel also shows whether sign-in is Enabled or Disabled and whether assignment is required. With a Professional license it also shows the last recorded sign-in.
- Business Owners, Technical Owners and Application Owners — one list per ownership role, in the same order as the Owners page of the end-user App. Each entry links to the user or service principal in Entra ID, and each list can be exported to CSV. The business and technical owner sections also list the permissions granted to that role.
- Compliance — one row per rule, with a Compliant or Non-compliant tag. The panel lists only the rules that the assigned policy actually evaluates and for which a result has been recorded, so it never reports on a rule that was never run. These are the same results as the rule columns described in Understanding compliance indicators.
The Open in Entra ID button at the bottom of the panel opens the application in the Microsoft Entra admin center.
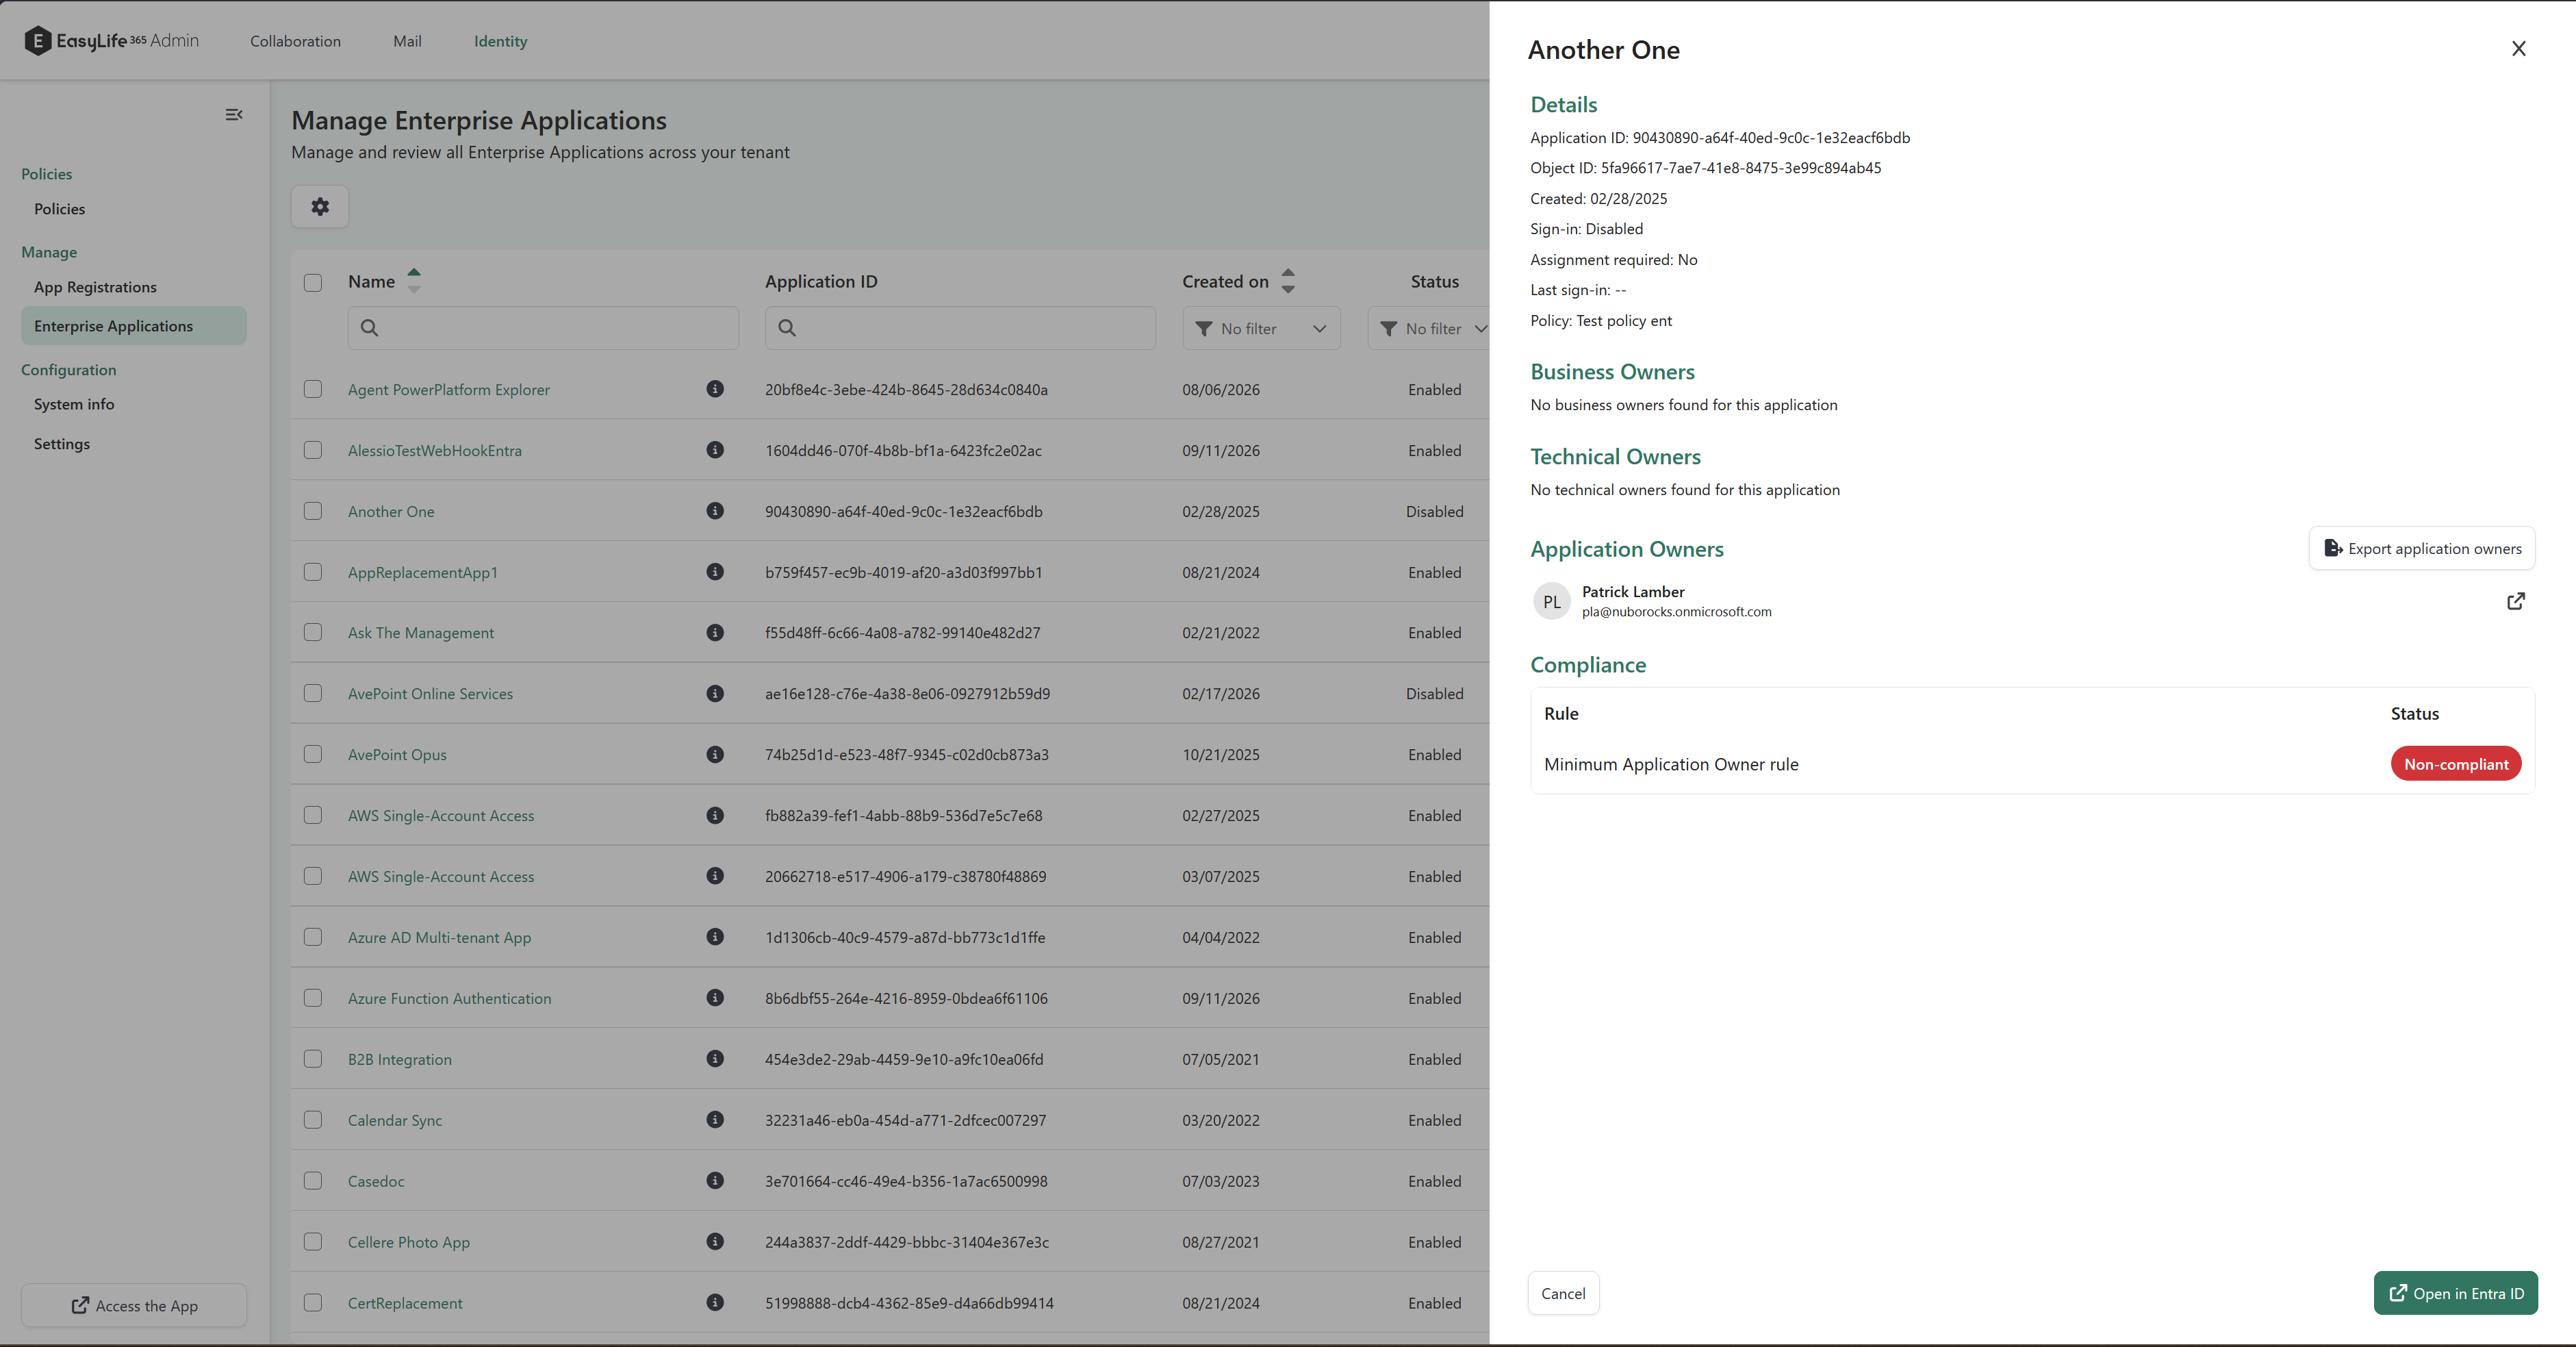
The Compliance section is hidden when the application has no policy assigned, or when the assigned policy configures none of the compliance rules.
Filtering and sorting
Each column in the table supports column-specific filtering and sorting, making it easy to isolate applications that need attention.
Common filtering scenarios include:
- Filtering owner rule columns to show only non-compliant apps
- Filtering by a specific policy
- Searching by application name or application ID
These capabilities support governance workflows such as cleanup initiatives or ownership audits. The table includes a reset button to clear all active filters and display the complete list of apps.
Policy assignment and changes
Policies can be assigned or changed directly from the Manage views.
Changing a policy for one or more applications
- Select one or more applications using the checkboxes in the table
- Use the Change policy action from the action bar
- Choose the desired policy from the list, or select Clear policy to remove an existing one
The new policy is applied (or the existing one cleared) immediately, and compliance is re-evaluated.
Bulk operations: export and import
For large-scale governance operations, the Manage views support bulk updates through CSV export and import.
Export
- Exports either the selected applications or, if none are selected, all currently visible applications
- The CSV file includes application identifiers and the currently assigned policy
Import
- Allows administrators to re-import a modified CSV file
- Policy assignments in the file are applied to the corresponding applications
- Application owners can be changed in the same file
This enables efficient bulk updates, such as reassigning policies across large sets of applications.
A CSV that changes application owners is imported only for administrators holding one of these Microsoft Entra ID roles:
- Application Administrator
- Cloud Application Administrator
- Global Administrator
- Privileged Role Administrator
Without one of them, the Import action is disabled and explains which role unlocks it. If the import reaches the service anyway, it is refused with Import not allowed and nothing in the file is applied.
Ask an administrator to grant you one of these roles, or to run the import for you.
Typical bulk workflow
- Filter the table to the relevant applications
- Select the apps of interest
- Export the visible rows to CSV
- Modify the policy column in the CSV file
- Import the file to apply changes at scale
Managing sign-in access
Administrators can control user access by enabling or disabling sign-in for applications directly from the Manage views.
Disable sign-in
To disable sign-ins:
- Select one or more applications from the table.
- Click the Disable sign-in button in the table toolbar.
- Review the confirmation dialog.
- Confirm the action to disable sign-ins for the selected application(s).
- Once disabled, users will no longer be able to sign in to the application.
Re-enable sign-in
To re-enable sign-ins:
- Select the disabled application.
- Click the Enable sign-in button in the table toolbar (the button icon reflects the disabled state).
- Confirm the action in the dialog.
Bulk sign-in operations
Sign-in state changes can be applied to multiple applications simultaneously:
- If all selected applications currently allow sign-ins, the action will disable sign-ins for all of them.
- If at least one selected application has sign-ins disabled, the action will enable sign-ins for all selected applications.
Deleting applications
Administrators can permanently remove applications from the Manage views.
Delete an application
- Select one or more applications from the table.
- Click the trash can button in the toolbar.
- Review the confirmation dialog.
- Confirm to permanently delete the selected application(s).
Deletion is irreversible
Deletion behavior
- When deleting an app registration, the associated enterprise application is deleted automatically.
- When deleting an enterprise application, if the associated app registration belongs to the current tenant, it is also deleted.