How to Configure Entra ID Authentication for Webhooks
EasyLife 365 supports Microsoft Entra ID authentication for webhooks, enabling secure, token-based authentication of requests sent to your endpoints. This ensures that only verified webhook calls from EasyLife 365 reach your services.
Overview
When Entra ID authentication is enabled:
-
Access Token Retrieval
EasyLife 365 retrieves an access token from Microsoft Entra ID using the enterprise application EasyLife 365 Insiders registered in your tenant. -
Token Injection
The access token is included in theAuthorizationheader of each webhook request. -
Token Validation
Your endpoint (e.g., an Azure Function) must validate the token. This includes verifying token claims, especially theoid(Object ID), which must match the Object ID of the EasyLife 365 Insiders enterprise application.
Prerequisite
Before configuring validation, retrieve the Object ID of the EasyLife 365 Insiders enterprise application from the Entra ID Enterprise Applications portal.
This value is essential for validating incoming tokens.
Step-by-Step Configuration
1. Register the Entra ID Application
- Sign in to the Microsoft Entra admin center
- Go to Applications > App registrations
- Click New registration
- Provide a meaningful name
- Click Register
- Copy the Application (client) ID for later use in the webhook configuration
Expose an API
- In the application, navigate to Expose an API
- Click Add a scope, then Save and continue
- Name the scope
user_impersonation - Provide a description and confirm by clicking Add scope
2. Configure the Azure Function
After creating your Azure Function:
- Go to Authentication
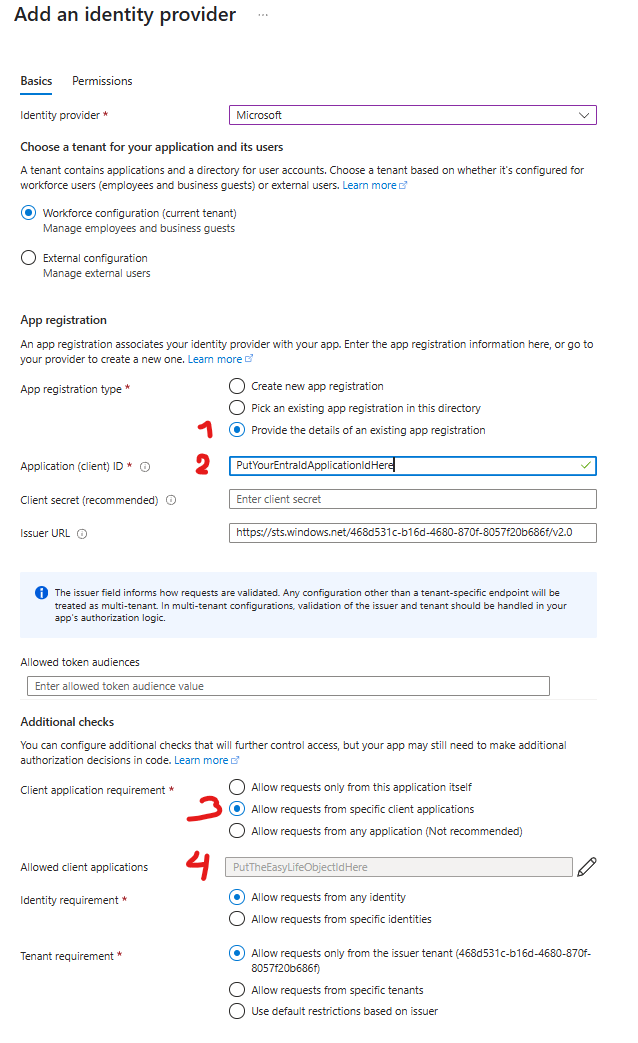
- Click Add identity provider and select Microsoft
- Under App registration type, choose Provide the details of an existing app registration
- Enter the Application (client) ID of the app you created in Step 1.
- Under Client application requirement, select Allow requests from specific client applications
- Add the Object ID of the EasyLife 365 Insiders enterprise application under Allowed client applications
- Click Add to finalize authentication setup
3. Configure Webhook in EasyLife 365
- In the EasyLife Admin interface, open the template or policy where the webhook is defined
- Enter the webhook URL
- From the dropdown, select
Entra IDas the authentication method - Provide the Application (client) ID of your app registration you created in Step 1.
Security Best Practices
- Always validate access tokens on your endpoint
- Ensure all webhook endpoints use HTTPS
- Monitor for failed authentication attempts or invalid tokens
Troubleshooting
- Token validation failures: Confirm the app has correct permissions and the token claims match your expectations
- Missing authentication: Ensure the webhook is correctly configured with Entra ID in EasyLife 365
- Access denied: Check that the Object ID in the Azure Function matches the enterprise app in your tenant
You can either use an existing Entra ID application or let Azure Functions generate one for you. This guide walks you through manual setup to maintain full control over configuration.