Generate a PnP Template for automation steps
PnP provisioning templates streamline the creation of custom site structures on provisioned sites. Supported by an active community, the PnP Provisioning Framework offers an open-source solution.
Generating and applying PnP provisioning templates
To generate and apply PnP provisioning templates in SharePoint, you have two options:
- Use the web interface in EasyLife to generate your PnP Template.
- Generate your own PnP Template using PnP PowerShell.
Generating a PnP Provisioning XML with PnP PowerShell
PnP PowerShell allows you to create a provisioning XML to configure SharePoint sites. When generating your own PnP provisioning XMLs, consider these important aspects:
- EasyLife does not support TermGroups due to permission limitations.
- Some fields may not be provisioned due to permission restrictions (e.g., special site fields).
Below is the PowerShell script to generate a template.xml from an existing site, excluding TermGroups:
Ensure $siteUrl and $templatePath variables are updated with your environment's values. Run this script with necessary permissions.
$templatePath = "C:\path\to\your\template.xml"
$siteUrl = "https://yoursite.sharepoint.com/sites/yoursite"

Import-Module PnP.PowerShell
Connect-PnPOnline -Url $siteUrl -Interactive

$template = Get-PnPProvisioningTemplate -Out "template.xml" -ExcludeHandlers TermGroups
Save-PnPProvisioningTemplate -Template $template -Out $templatePath

Disconnect-PnPOnline
EasyLife 365 refuses an XML template that holds file entries (pnp:File), folder entries (pnp:Directory) or list item attachments. To bring files into new sites, use a .pnp package whose files all go to the Site Assets library, or generate a package in EasyLife 365.
Generating a package with files
To give new sites files from an existing site, let EasyLife 365 build a package from that site:
- Open a SharePoint automation step and select Generate template under Apply PnP Template.
- Enter the Source URL of the site in the Generate PnP provisioning template panel and choose the other options.
- Under Files, tick Include Site Assets.
- Select Generate.
The page then shows that a PnP provisioning package is assigned. Provisioning a new site with the step places the files in the Site Assets library of the new site, in the same folders as in the source site.
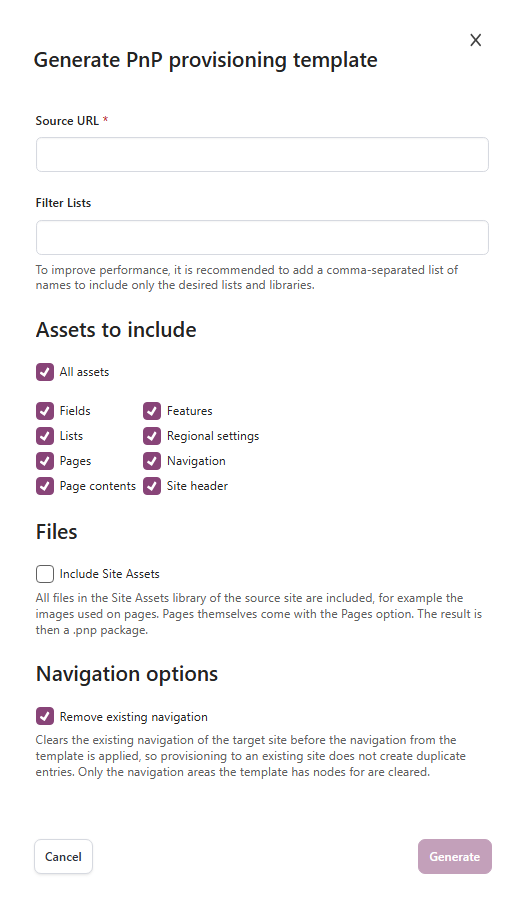
Include Site Assets adds every file of the Site Assets library of the source site, including its subfolders. You cannot pick single files. Pages come with the Pages option under Assets to include.
What a package can contain
- Files go into the Site Assets library only. A package with a file for another library, such as Shared Documents, is rejected, also a package that PnP PowerShell exported for another library.
- Generate takes at most 500 files and 25 MB in total. If the library of the source site is larger, or holds more than 1000 folders, Generate fails and tells you why. A package that you upload can be up to 25 MB.
- Generate leaves out what a site cannot take over safely: the Forms and Lists folders, the site icon files, files with their own permissions, files that have no published version, pages, scripts and programs (for example
.aspx,.htmland.ps1), OneNote files, files with an unusual extension, and files whose name or folder contains characters such as{}or%. - If two folders hold files with the same name, both stay.
Uploading your own package or XML
Upload accepts .xml and .pnp. EasyLife 365 checks the file when you upload it and shows the reason when it refuses it:
- A package must open, contain a valid template and contain every file that the template refers to. When a file is missing, the message names it, and no site is changed.
- An XML template cannot carry files. EasyLife 365 refuses an XML with a file entry (
pnp:File), a folder entry (pnp:Directory) or a list item attachment, and points you to a package. ASrcvalue must be a plain file name that the package holds. A path is not accepted.
You cannot add files to a template that is assigned to a step, nor remove them. To change the files, create a new package and assign it, or select Clear and upload another one.
Testing Your PnP Template
Create a new site and test your template's functionality with the following script:
Connect-PnPOnline -Url https://targetsite.sharepoint.com/sites/targetsite -Interactive
Apply-PnPProvisioningTemplate -Path "C:\path\to\your\template.xml"
Disconnect-PnPOnline
Uploading the XML to automation steps
Upload template.xml or a .pnp package to SharePoint Automation Steps under the PnP Section.
Known Issues
Applying automation steps with a PnP template may fail in certain scenarios. Consider these tips:
- Reduce data in the XML to facilitate smoother provisioning.
- If "Access Denied" errors occur for SiteFields, modify the XML by removing unnecessary fields under the "SiteFields" node.